Oblivion:Silver Tooth Cave
| This place page is currently being rechecked as part of the Oblivion Remastered Project. The page is being checked in several stages to verify any changes due to the release of Oblivion Remastered. All users are welcome to make changes to the page. If you make a change that is relevant to the project, please update this template accordingly, and make sure you have observed the project guidelines. Details Walkthrough: not written Interior Remastered Images: not added |
|
|||
|---|---|---|---|
| # of Zones | 2 | ||
| Occupants | |||
| Goblins (1 boss-level Goblin) |
|||
| Important Treasure | |||
| 1 boss-level Chest 02 | |||
| Console Location Code(s) | |||
| SilvertoothCaveExterior, SilverToothCave, SilverToothCave02 | |||
| Region | |||
| Jerall Mountains | |||
| Location | |||
| East of the junction of the Silver and Orange Roads, Northwest of Lake Arrius | |||
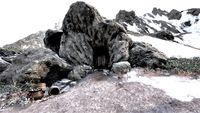
Silver Tooth Cave is a medium-sized cave between Cheydinhal and Bruma containing goblins. It contains two zones: Silver Tooth Cave and Silver Tooth Warrens.
Notes[edit]
- This cave contains 84 Cairn Bolete plants and 106 Wisp Stalk plants.
- Silver Tooth Pass appears in the same area on ESO.
Exterior[edit]
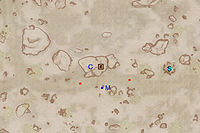
- The exterior is located at coordinates: Tamriel 20, 31
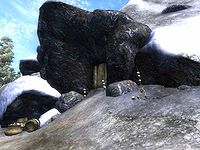
- This location's map marker (M on map) is named Silver Tooth Cave (editor name SilverToothCaveMapMarker). The entrance door is N of the marker, 40 feet away.
- 2 Wilderness Creatures (Snowy Mountains variety) are near the entrance
- The following plants can be found near the entrance: 4 Clouded Funnel Cap plants, 8 Milk Thistle plants, 3 Motherwort plants, 10 Tinder Polypore plants, and 6 Wormwood plants
- 1 Hestra Rune Stone is at location S on map
Zone 1: Silver Tooth Cave[edit]
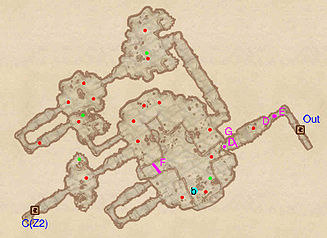
Silver Tooth Cave contains a large number of goblins but a plentiful amount of treasure makes it worth exploring. The first zone greets you with a narrow tunnel; look out for the Pressure Plate at E that activates a Swinging Mace trap (D) when you turn left. Some opposition will greet you after passing this obstacle. At the end of the narrow tunnel, watch out for the Tripwire at G that activates another Swinging Mace (D).
You will now find yourself in the lower level a large chamber. Explore the southern corner first, where you will find an area with a minor loot chest, an enemy, a campfire and bedroll (b). After this, use the tunnel in the western wall to access the upper level. On this level you will have to deal with up to 6 enemies attacking you. Once you arrive, head north and take care when crossing the Rotten Plank at F. For now, ignore the first tunnel on the left that you will see and head into the second one. After following the tunnel, you will find yourself in a room with a chest containing minor loot guarded by one foe. Continue forward into another tunnel until you enter a room guarded by three foes. It is advisable to take care of these enemies before entering the next room which has two more foes. Be sure to loot the locked chest after taking care of the opposition. Continue forward and you will soon find yourself back in the large, central chamber. Make your way back to the previously ignored tunnel near the Rotten Plank. You will now find yourself in a smaller room with one enemy and a chest containing potions. After taking care of this, proceed through door C into Silver Tooth Warrens.
Occupants:
- 12 Goblin Enemies (each 80% probability Goblin, 13% Rat, 7% Mud Crab)
- 5 Nuisance Animals
Treasure:
- 2 Chests 01
- 1 Chest 02 (locked)
- 1 Chest 04
- The following plants will always be found: 55 Cairn Bolete plants and 50 Wisp Stalk plants
Traps:
- 1 Pressure Plate trigger at location E on map
- 1 Rotten Plank trap at F
- 2 Swinging Mace traps at D
- 1 Tripwire trigger at G
Doors and Gates:
- There are two doors in/out of this zone
- 1 door (at Out) leads outside
- 1 door (at C) leads out of dungeon to Silver Tooth Warrens
Other:
- 1 bedroll at location b on map
Zone 2: Silver Tooth Warrens[edit]
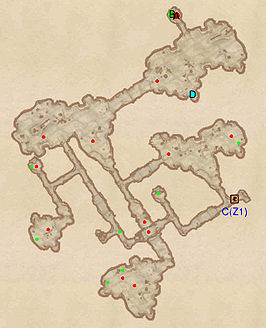
The goal of this zone is to reach the boss chest located at B. You will immediately be faced with an intersection, so head up the southwestern tunnel until you reach another intersection. The path to the southwest only leads to a caved-in dead end guarded by one foe, so head north instead to access a locked minor loot chest.
Make your way back to the intersection at the beginning of the zone and this time take the northern tunnel. You will first emerge in a room with a minor loot chest guarded by two enemies. Take the tunnel heading west and you will quickly find yourself at an intersection. Head south, battle past one enemy and follow the path to a room with two chests guarded by two enemies. Return to the intersection and this time take the northern tunnel, which leads to a room with two enemies. From here, you can first take the southwestern tunnel, which leads to yet another intersection. Continuing south eventually leads to the other side of the previously-encountered cave-in and to a minor loot chest, while the western passage provides access to two small rooms each containing one enemy and one minor loot chest.
Once you've explored this section, return to the northern room and this time head east into another large room. Here you will find the boss-level goblin (A) and another enemy guarding the boss chest at B and another minor loot chest nearby. In the south corner of this room you will also find a Dead Captive behind a locked gate at D; check his body as it may contain an enchanted piece of jewelry. Once you are done, make your way back to door C to return to Silver Tooth Cave.
Occupants:
- 1 boss-level Goblin at location A on map
- 11 Goblin Enemies (each 80% probability Goblin, 13% Rat, 7% Mud Crab)
Treasure:
- 1 boss-level Chest 02 (Goblin variety; locked) at location B on map
- 3 Chests 01 (1 locked)
- 4 Chests 02 (1 locked)
- 1 Chest 03
- The following plants will always be found: 29 Cairn Bolete plants and 56 Wisp Stalk plants
Doors and Gates:
- There is one door (at C) in/out of this zone, leading to the zone Silver Tooth Cave
Other:
- 1 Dead Captive (10% chance enchanted jewelry) at location D on map
