Oblivion:Cheydinhal Oblivion World
| This place page is currently being rechecked as part of the Oblivion Remastered Project. The page is being checked in several stages to verify any changes due to the release of Oblivion Remastered. All users are welcome to make changes to the page. If you make a change that is relevant to the project, please update this template accordingly, and make sure you have observed the project guidelines. Details Walkthrough: not written Interior Remastered Images: not added |
| Oblivion World: Cheydinhal Oblivion World (lore page) | |
|---|---|
| # of Peripheral Towers | 1 |
| # of Non-Random Caves | 2 |
| Important Treasure | |
| |
| Console Location Code | |
| Worldspace: MS13CheydinhalOblivionWorld MS13OblivionCave01 MS13OblivionCave02 MS13OblivionSmallTower01 MS13OblivionCitadel MS13OblivionHall01 MS13OblivionHall02 MS13OblivionCitadelLord | |
| Fixed Gate | |
| Gate outside Cheydinhal (map) | |
Cheydinhal Oblivion World is a large Oblivion World only encountered at Cheydinhal (quest-specific).
The Oblivion Gate in front of Cheydinhal always connects to this world.
Contents
Related Quests[edit]
- The Wayward Knight: You must escort Farwil and his fellow knight through the Oblivion gate to retrieve the sigil stone to close the gate.
Exterior[edit]
This world is essentially a single large hill surrounded by lava, and when you enter from the Oblivion Gate at OG you will find yourself at the very top of it. Your main objective as part of The Wayward Knight quest is to reach Farwil Indarys and Bremman Senyan, who can be found at the base of the hill to your southeast, at location Q. The quickest way is to simply jump down the various levels, though this will likely cause you some health damage. The alternative is to follow the winding path down and to make your way through two cave systems (The Bowels 01 and The Bowels 02).
The first sign that all is not well is the bloody corpse of the Fallen Knight of the Thorn (k) you will immediately come across when exiting the gate. Make your way down the hill following the numerous pools of blood, past two avalanche traps (a) and two enemies, until you reach the door (B) to the first cave system. You will re-emerge via door C at a lower level of the hill. Follow the path as bends down towards the south, battling past another enemy. You will soon come across another Fallen Knight (k) as well as two enemies guarding the entrance (D) to the second cave system.
Once you re-emerge from door E, you will immediately find Farwil and Bremman in front of you. Once you speak to Farwil, he and his companions will start following you, though Farwil in particular is more a hindrance than a help in battle. The quickest route out of this world is to simply head directly across the bridge in front of you to the door (F) to the Sigil Keep. Along the way you will come across two dead scamps (s) and another Fallen Knight (k) with a Steel Bow, a Steel Claymore, a Steel Dagger and a Steel Shield nearby (H). Four enemies (of which three Dremora) patrol the bridge. Note that if you don't speak to Farwil the two War Gates at G will not open, meaning you won't be able to access the Sigil Keep unless you have a relatively high Acrobatics skill.
Alternatively, you can explore the world more fully by following the path that winds around the entire base of the hill. If you head clockwise from E and cross the entire southern portion of hill's base, you will face three enemies and need to negotiate three fire turrets (f) and three land mines (m) until you can reach the door (A) to the Blood Well, the only peripheral tower in this world. Press on north towards the northwestern corner, past two turrets and one enemy, to loot the only Fleshy Pod in this world. Once you've made your way past another enemy and three more turrets, you will see a paved path leading to an enclosed area to the northeast: two more enemies can be found here. Make your way south now, past another turret and enemy, to return to door E.
Occupants:
- 9 Daedra
- 5 Daedric occupants (Daedra or Dremora)
- 1 Dremora
- 2 Dremora Archers
- 2 Scamps (dead) at locations s on map
- 3 Fallen Knights of the Thorn at k
- Farwil Indarys and Bremman Senyan at Q
Treasure:
- 1 Fleshy Pod Ext
- 1 Steel Bow, 1 Steel Claymore, 1 Steel Dagger and 1 Steel Shield at location H on map
Plants:
- Plants are marked by yellow dots on map
- 212 Blood Grass plants
- 28 Harrada plants
- 20 Spiddal Stick plants
- 13 Blood Grass plants and 1 Harrada plant are in inaccessible locations
Traps:
- 3 Avalanche traps at locations a on map
- 9 Fire Turret traps at f
- 3 Land Mine traps at m
Doors and Gates:
- There are seven doors in/out of this zone
- 1 Oblivion Gate (at OG) leads to Tamriel
- 1 door (at A) lead to the zone Blood Well (Z1)
- 2 doors (at B and C) lead to the zone The Bowels 01 (Z2)
- 2 doors (at D and E) leads to the zone The Bowels 02 (Z3)
- 1 door (at F) leads to the zone The Chaos Stronghold (Z4)
Other:
- 2 War Gates at locations G on map
Blood Well[edit]
The Blood Well is in the southwestern corner of the world and has an entrance at ground level. At the bottom of tower when entering from door A you will find two enemies guarding a Corpse Masher lift. Pull the nearby lever and jump onto the lift, which brings you to the middle section. Make your way up the tower, passing a number of hanging corpses and two hanging Fleshy Pods. At the top is another enemy guarding a boss-level Fleshy Pod (B), a Blood Fountain (b) and a Magicka Essence (m).
Occupants:
Treasure:
- 1 Fleshy Pod (Healing)
- 1 Fleshy Pod Hanging
- 1 Boss Fleshy Pod Sack01 at location B on map
Doors and Gates:
- There is one door (at A) in/out of this zone, leading outside
Other:
- 1 Blood Fountain at location b on map
- 1 Magicka Essence at m
The Bowels 01[edit]
When entering from door B, you will find yourself in a room with three minor loot Fleshy Pods. Jump down the nearby hole to find yourself in a room with another two Fleshy Pods guarded by a Daedra. From here, again jump down another hole to the final room, where you find another Fallen Knight (k) and a Daedra guarding a Fleshy Pod. Use the door at C to return to the exterior.
Occupants:
- 2 Daedra
- 1 Fallen Knight of the Thorn at location k on map
Treasure:
Plants
- 4 (aggressive) Harrada plants
Doors and Gates:
- There are two doors (at B and C) in/out of this zone, both leading outside
The Bowels 02[edit]
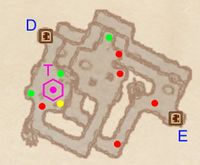
Upon entering from door D you will immediately find yourself in a room with a Daedra, two Fleshy Pods and a combined gas and ground claw trap (T). Press on until you reach another room with a Daedra guarding a Fleshy Pod. Jump down the nearby hole and fight off the two Daedra nearby. Here you will also find another hole which drops you into a lake of lave below the floor. While it is technically possible to drop down and then swim to another hole near the exit, this result in major health loss. Instead, take either of the nearby tunnels, which lead you to the final room, where a Daedra guards the door (E) leading back outside.
Occupants:
- 5 Daedra
Treasure:
Traps
- 1 Gas Trap at location T on map
- 1 Ground Claw Trap at T
Plants
- 1 (aggressive) Harrada plant
Doors and Gates:
- There are two doors (at D and E) in/out of this zone, both leading outside
The Chaos Stronghold[edit]
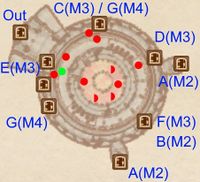
The Chaos Stronghold is the Sigil Keep of this world, with its entrance in the southeastern part of the island. On entering from door Out, you will be in the lowest level of the tower, where you will find two to five enemies. From here, use either of the doors at A to enter the Rending Halls.
When returning from the Rending Halls via door B, you can either head up the tower to the right or to the left. Both lead to doors (D and C respectively) to enter the Corridors of Dark Salvation, though the former is guarded by one Dremora and the latter by two. Using either of the doors at E from the Corridors will take you to a small balcony area hosting one The Punished container. When you instead return from the Corridors via door F, you will be on a higher level. Keep climbing until you reach the two doors (G) leading to the Sigillum Sanguis, which are guarded by two more Dremora.
Occupants:
Treasure:
Doors and Gates:
- There are eleven doors in/out of this zone
- 1 door (at Out) leads outside
- 2 doors (at A, first level) lead to the zone Rending Halls (M2)
- 1 door (at B, second level) leads to the zone Rending Halls (M2)
- 1 door (at C, second level) leads to the zone Corridors of Dark Salvation (M3)
- 1 door (at D, second level) leads to the zone Corridors of Dark Salvation (M3)
- 2 doors (at E, third level) lead to the zone Corridors of Dark Salvation (M3)
- 1 door (at F, fourth level) leads to the zone Corridors of Dark Salvation (M3)
- 2 doors (at G, fourth level) lead to the zone Sigillum Sanguis (M4)
- Note that four doors (C and G; B and F) are located directly above each other and thus appear as a single door on the map.
Rending Halls[edit]
Upon entering from the lowest level of The Chaos Stronghold via either of the doors at A, make your way up the corridor after battling past a Dremora. The final room hosts two Magicka Essences (m) guarded by another Dremora. Take the door at B to return to the second level of The Chaos Stronghold.
Occupants:
- 3 Dremora
Doors and Gates:
- There are three doors in/out of this zone
- 2 doors (at A) lead to the zone Chaos Stronghold, first level (M1)
- 1 door (at B) leads to the zone Chaos Stronghold, second level (M1)
Other:
- 2 Magicka Essences at locations m on map
Corridors of Dark Salvation[edit]
You can enter from the second level of The Chaos Stronghold via either door C or door D. In the former case, you will arrive in a small room with an enemy and two spike traps (s) guarding one The Punished container. Open the door at H to access the next room, where you will find up to three enemies, a Blood Fountain (b) and door D. Open the door at I and make your way up the corridor until you reach the two doors at E. These provide access to the third level of The Chaos Stronghold, which is a small balcony area with one The Punished container. Continue along the corridor until you arrive at door G, beyond which is the final room of this zone. Here you will find two trident blade traps (t) and up to two enemies guard the door (F) leading back to the fourth level of The Chaos Stronghold.
Occupants:
Treasure:
Traps:
- 1 Citadel Spike trap at locations s on map
- 2 Citadel Trident Blade traps at t
Doors and Gates:
- There are five doors in/out of this zone
- 1 door (at C) leads to the zone Chaos Stronghold, second level (M1)
- 1 door (at D) leads to the zone Chaos Stronghold, second level (M1)
- 2 doors (at E) lead to the zone Chaos Stronghold, third level (M1)
- 1 door (at F) leads to the zone Chaos Stronghold, fourth level (M1)
- 3 Citadel Doors at G, H and I (unlocked)
Other:
- 1 Blood Fountain at location b on map
Sigillum Sanguis[edit]
This is the final zone of this world, comprising a single large room over three levels. Upon entering from The Chaos Stronghold via either of the doors at G, you will find yourself in a corridor with a Blood Fountain (b) before emerging in a large circular room. Climb up to the second level, where you will find up to two enemies guarding two boss-level The Punished containers. The third and final level hosts a boss-level Dremora (A) and the world's Sigil Stone (S). As soon as you take the stone, you will be transported back to the area in front of the Cheydinhal city gate.
Occupants:
- 1 boss-level Dremora (always best possible level) at location A on map
- 0-2 Daedric occupants (Daedra or Dremora)
Treasure:
- 1 random Sigil Stone at location S on map
- 2 boss-level The Punished at B
Doors and Gates:
- There are two doors (at G) in/out of this zone, both leading to the zone Chaos Stronghold, fourth level (M1)
Other:
- 1 Blood Fountain at location b on map


