Oblivion:Random Oblivion World 2
| Oblivion World: Random Oblivion World 2 (lore page) |
|
|---|---|
| # of Peripheral Towers | 7 |
| # of Non-Random Caves | 1 |
| Important Treasure | |
|
|
| Console Location Code | |
| Worldspace: OblivionRD002 OblivionRD002Citadel OblivionRD002CitadelLava OblivionRD002CitadelLordB OblivionRD002Hall01 OblivionRD002Hall02 OblivionRD002Hall02Lava OblivionRD002LavaCave OblivionRD002Tower01Left OblivionRD002Tower01Right OblivionRD002Tower02Left OblivionRD002Tower02Right OblivionRD002Tower03Left OblivionRD002Tower03Right |
|
| Fixed Gate | |
| Gate outside Chorrol (map) (after Dagon Shrine has been completed) | |
Random Oblivion World 2 is a large-sized World, and one of seven randomly chosen Oblivion Worlds.
The Oblivion Gate in front of Chorrol always connects to this world.
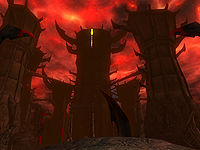
When you step out of the gate the main tower is directly in front of you, surrounded by six additional towers. The main tower in this world is always the Portals of Natural Disaster. The peripheral towers are named after disasters.
The surface of this world itself has relatively little loot. However, there are a large number of plants to be harvested and enemies to be confronted. If you really feel like exploring, there are also a large number of empty islands (no loot, enemies, or plants) that can be accessed if you can survive a brief swim through the lava.
There is a hidden bonus area in this world containing two leveled weapons and some boss-level loot. The weapons are there even if you have already been through this world before, making it possible to acquire multiple copies of the leveled weapons.
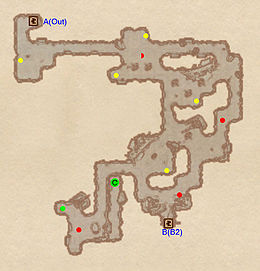
The hidden area is in the eighth tower, The Embers of Hatred, which is the collapsing tower directly to the north when you first come through the Oblivion Gate. To get into the tower, though, you need to go through a hidden cave. Circle east of the tower, then head northwest, stopping directly north of the tower. From there jump the rock wall, and the lava beyond, to the west and follow the landmass and small wall that curves northeast. At the very end of this island is a cliff overseeing the lava on the eastern side which leads to The Fume Vaults. Simply hop down and turn around.
Contents
Exterior[edit]
You can walk straight to the main tower, but there is no ground level entrance to it. If you try to explore around the base of the tower, you will quickly discover that there are four War Gates that would prevent you from accessing areas adjacent to the tower. Four of the peripheral towers can be accessed readily, while the entrances to Earthquake and Hurricane are behind the War Gates.
Each War Gate is opened by a switch at the top of the adjacent, similarly named tower (although the gate controls in the towers are all mislabeled). There is also a door at the top of each tower but it does not really help you: it leads to a single level in the main tower, which only provides access to the four corner towers. Once you have opened at least one War Gate, you will have to climb Earthquake or Hurricane; either of these two towers leads you into a new level of the main tower. Alternatively, once you use one of these four towers to make it to the Portals of Natural Disaster tower, you can just jump down a level to the Rending Halls door, provided your Acrobatics is high enough.
If you're looking for a shortcut, the ground floor of Earthquake can be accessed directly after entering from the Oblivion Gate. Head directly southeast from the starting point and around the side of Tsunami (L1) opposite the War Gate, climb a small hill, then drop down a small ledge on the south wall of Tsunami. This places you directly behind the War Gate at M. The ground floor entrance to Earthquake is directly accessible from here. Note that getting back out of this area is much more difficult, because this shortcut does not open the War Gate. However, this is not an issue if you're heading to the Sigil Stone to close the gate.
Occupants:
- 10-29 Daedra
Treasure:
Plants:
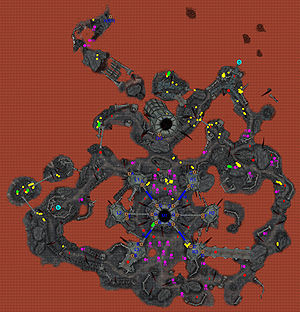
- Plants are marked by yellow dots on map
- 57 Blood Grass plants
- 22 Harrada plants
- 28 Spiddal Stick plants
Traps:
- 11 Fire Turret traps at locations f on map
- 25 Land Mine traps at m
Doors and Gates:
- There are 20 doors in/out of this zone
- 1 Oblivion Gate (at OG) leads to Tamriel
- 2 doors (at A) lead to the zone Eruption (L1)
- 2 doors (at B) lead to the zone Landslide (L3)
- 2 doors (at C) lead to the zone Tsunami (R1)
- 2 doors (at D) lead to the zone Tornado (R3)
- 2 doors (at E) lead to the zone Earthquake (L2)
- 2 doors (at F) lead to the zone Hurricane (R2)
- 6 doors (at G) lead to the zone Portals of Natural Disaster (M1)
- 1 door (at H) leads to the zone The Fume Vaults (B1)
- 1 Eruption gate (initially closed) at location J
- 1 Landslide gate (initially closed) at location K
- 1 Tornado gate (initially closed) at location L
- 1 Tsunami gate (initially closed) at location M
Other:
- 2 Blood Fountains at locations b on map
Eruption[edit]
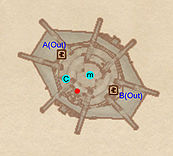
One Daedra can be found on the lowest level of this tower. The usual Corpse Masher can also be found in this tower, which can bring you to one level higher. If you ascend the winding path to the top, you'll find two switches there. One will release the skeleton from the Torture Cage behind you, and the other will open the Eruption gate outside.
Occupants:
Doors and Gates:
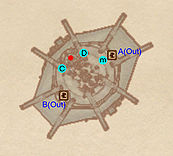
- There are two doors in/out of this zone
- 1 door (at A, lowest level) leads outside
- 1 door (at B, highest level) leads outside to the bridge to the zone Portals of Natural Disaster (M1)
Other:
- 1 Landslide [sic] Gate Control at location C on map, highest level
- 1 The Cage Master at D, highest level
- 1 Magicka Essence at m
Landslide[edit]
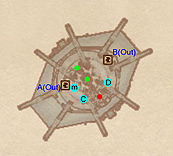
There are no doors on the lowest level of this tower, so you will have to drop down (or call the Corpse Masher) to get there. At the bottom you can find a single Daedra and The Punished. If you ascend the tower to the top, you'll find one switch there, which will open the Landslide gate outside.
Occupants:
Treasure:
Doors and Gates:
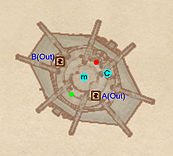
- There are two doors in/out of this zone
- 1 door (at A, first level) leads outside
- 1 door (at B, highest level) leads outside to the bridge to the zone Portals of Natural Disaster (M1)
Other:
- 1 Eruption [sic] Gate Control at location C on map, highest level
- 1 Magicka Essence at m
Tsunami[edit]
One Daedra can be found on the lowest level of this tower. The usual Corpse Masher can also be found in this tower, which can bring you to one level higher. If you ascend the winding path to the top, you'll find one switch there, which will open the Tsunami gate outside.
Occupants:
Doors and Gates:
- There are two doors in/out of this zone
- 1 door (at A, lowest level) leads outside
- 1 door (at B, highest level) leads outside to the bridge to the zone Portals of Natural Disaster (M1)
Other:
- 1 Tornado [sic] Gate Control at location C on map, highest level
- 1 Magicka Essence at m
Tornado[edit]
There are no doors on the lowest level of this tower, so you will have to drop down (or call the Corpse Masher) to get there. At the bottom you can find a single Daedra and The Punished. If you ascend the tower to the top, you'll find two switches there. One will release the dead Mythic Dawn Guard from the Torture Cage behind you, and the other will open the Tornado gate outside.
Occupants:
Treasure:
- 1 The Punished 01
- 1 dead Mythic Dawn Guard (with inventory)
Doors and Gates:
- There are two doors in/out of this zone
- 1 door (at A, first level) leads outside
- 1 door (at B, highest level) leads outside to the bridge to the zone Portals of Natural Disaster (M1)
Other:
- 1 Tsunami [sic] Gate Control at location C on map, highest level
- 1 The Cage Master at D, highest level
- 1 Magicka Essence at m
Earthquake[edit]
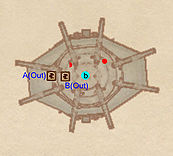
One Daedra can be found on the lowest level of this tower. The usual Corpse Masher can also be found in this tower, which can bring you to one level higher. You have to ascend the winding path, where you can find the door leading outside to the Portals of Natural Disaster on the way. If you ascend to the top of the winding path you will only find a Blood Fountain there and possibly a Daedra.
Occupants:
Doors and Gates:
- There are two doors in/out of this zone
- 1 door (at A, lowest level) leads outside
- 1 door (at B, mid level) leads outside to the bridge to the zone Portals of Natural Disaster (M1)
Other:
- 1 Blood Fountain at location b on map
Hurricane[edit]
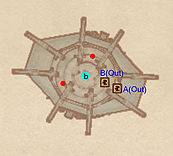
One Daedra can be found on the lowest level of this tower. The usual Corpse Masher can also be found in this tower, which can bring you to one level higher. You have to ascend the winding path, where you can find the door leading outside to the Portals of Natural Disaster on the way. If you ascend to the top of the winding path you will only find a Blood Fountain there and a Daedra.
Occupants:
Doors and Gates:
- There are two doors in/out of this zone
- 1 door (at A, lowest level) leads outside
- 1 door (at B, mid level) leads outside to the bridge to the zone Portals of Natural Disaster (M1)
Other:
- 1 Blood Fountain at location b on map
Portals of Natural Disaster[edit]
This keep consists of five levels: one ground level and four upper levels. Unlike most Sigil Keeps, you cannot enter the Portals of Natural Disaster at the ground level; there is no door. Instead, you have to enter from one of the six bridges leading from the peripheral towers in this Oblivion World. But four of those bridges will lead to the second level, from which there is no path to the rest of the tower (you can find two The Punished there). Instead, you have to enter the tower from one of the two bridges leading from Earthquake or Hurricane. That will land you on the first of the tower. From there, you can enter the Rending Halls.
You can try to carefully jump down from the second level to the first, which makes a considerable shortcut.
If you used the Rending Halls to descend to the ground level, you will encounter several Daedra there. Two of The Punished can also be found here, so it might be worth the detour. The ground level itself is a dead end; you'll have to ascend the Rending Halls again.
In the end, you must visit the Rending Halls to climb to the third level of the tower. You may encounter a few Daedra there, but little else than a ramp upwards to the door to the Corridors of Dark Salvation.
The fourth level may contain a few Daedra. You can also find the two doors there that lead to the Sigillum Sanguis.
Occupants:
- Ground level: 2-4 Daedric occupants (Daedra or Dremora)
- First level: 0-2 Daedric occupants
- Third level: 0-2 Daedric occupants
- Fourth level: 0-2 Daedric occupants
Treasure:
Traps:
- Falling in the pool of lava in the middle of the ground level will result in instant death
- Touching the fire pillar in the middle of the room will result in instant death
Doors and Gates:
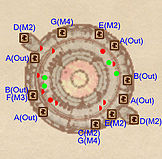
- There are fifteen doors in/out of this zone
- 4 doors (at A, second level) lead outside to bridges to the zones Eruption (L1), Landslide (L3), Tsunami (R1), and Tornado (R3)
- 2 doors (at B, first level) lead outside to bridges to the zones Earthquake (L2) and Hurricane (R2)
- 1 door (at C, first level) leads to the zone Rending Halls (M2)
- 2 doors (at D, ground level) lead to the zone Rending Halls (M2)
- 2 doors (at E, third level) lead to the zone Rending Halls (M2)
- 1 door (at F, third level) leads to the zone Corridors of Dark Salvation (M3)
- 1 door (at F, fourth level) leads to the zone Corridors of Dark Salvation (M3)
- 2 doors (at G, fourth level) lead to the zone Sigillum Sanguis (M4)
Rending Halls[edit]
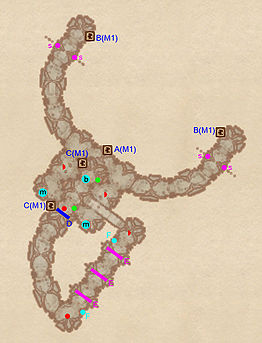
You start out in a large room, where a few Daedra can be found. At your left and right you will find two corridors leading downstairs. Both corridors will lead you past Citadel Spike traps to a door to the ground level of Portals of Natural Disaster. If you choose to go straight ahead, you have to ascend a long corridor that ends at a series of Citadel Guillotine Blade traps. You can try luring the possible Daedra behind the traps to you, and using the nearby Claw Lever trigger to trap it under the Blades.
You can find a small corridor left of you at the end that leads to a small room with two of The Punished and two doors leading to the third level of Portals of Natural Disaster.
Occupants:
Treasure:
Traps:
- 4 Citadel Spike traps at locations s on map
- 3 Citadel Guillotine Blade traps at E
- 2 Claw Lever triggers (activate Citadel Guillotine Blade traps) at F
Doors and Gates:
- There are five doors in/out of this zone
- 1 door (at A) leads to the zone Portals of Natural Disaster, first level (M1)
- 2 doors (at B) lead to the zone Portals of Natural Disaster, ground level (M1)
- 2 doors (at C) lead to the zone Portals of Natural Disaster, third level (M1)
- 1 door (initially closed) at location D
Other:
- 1 Blood Fountain at location b on map
- 2 Magicka Essences at m
Corridors of Dark Salvation[edit]
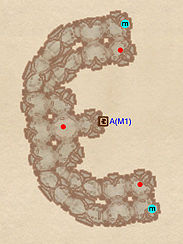
There is little else to do in this zone then to use one of the corridors (left and right) to ascend all the way to the top of this zone. You will encounter a few Daedra on the way.
Occupants:
Doors and Gates:
- There are two doors in/out of this zone
- 1 door (at A) leads to the zone Portals of Natural Disaster, third level (M1)
- 1 door (at A) leads to the zone Portals of Natural Disaster, fourth level (M1)
Other:
- 2 Magicka Essences at locations m on map
Sigillum Sanguis[edit]
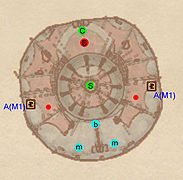
Ascend the ramp and pass through the opening to find yourself in the room that contains the Sigil Stone. Here you can find a few Dremora Mages. There are also two Magicka Essences, one Blood Fountain, and a boss-level The Punished on the upper levels. Be careful if you are sneaking that the Dremora can spot you easier than that you're used to, due to the openness of the area. Once you have reached the top you can grab the Sigil Stone to close the Oblivion Gate.
Occupants:
- 1 Dremora Mage at location B on map (always best possible level)
- 2 Dremora Mages
Treasure:
- 1 boss-level The Punished at location C, highest level, on map
- 1 random Sigil Stone at location S, highest level, on map
Traps:
- Touching the fire pillar in the middle of the room will result in instant death
Doors and Gates:
- There are two doors in/out of this zone
- 2 doors (at A) lead to the zone Portals of Natural Disaster, fourth level (M1)
Other:
- 1 Blood Fountain at location b on map
- 2 Magicka Essences at m
The Fume Vaults[edit]
Once you enter the cave start heading south. Eventually you will reach the door to The Embers of Hatred. You can take a detour to the west. There you will find a pit of lava. You can actually jump into the pit and quickly swim north for a boss-level Fleshy Pod. Jumping out of the pit is actually much more difficult, as it requires a combination of Water Walking and high Acrobatics, not to mention the measures to combat the constant lava damage. Make sure you have saved before attempting to reach the Fleshy Pod.
Occupants:
Treasure:
- 1 boss-level Fleshy Pod Sack02 at location C on map
- 1 Fleshy Pod Bag
Plants:
- Plants are marked by yellow dots on map
- 5 (aggressive) Harrada plants
Doors and Gates:
- There are two doors in/out of this zone
- 1 door (at A) leads outside
- 1 door (at B) leads to the zone The Embers of Hatred (B2)
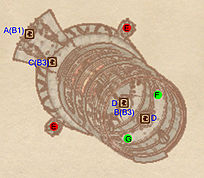
The Embers of Hatred[edit]
The Embers of Hatred looks much like a Sigil Keep. You'll start at the ground level, where you are confronted by two Dremora Hatred Keepers, powerful Dremora. They both carry a key that you need to pass through doors in order to climb the tower. The lava in the center doesn't harm you. Pass through the Halls of Dark Hate to ascend to a Runed Portal. This portal will teleport you to the highest level of the tower. There you can find two The Forbidden containing two unique weapons: Hatreds Heart and Hatreds Soul (including some unique arrows).
Occupants:
- Ground level: 2 Dremora Hatred Keepers at locations E on map
Treasure:
- 1 Hatreds Heart inside The Forbidden at location F on map
- 1 Hatreds Soul inside The Forbidden at location G on map
- 13 Hatreds Soul Arrows inside The Forbidden at location G on map
- 1 Daedra Heart inside The Forbidden at location G on map
Doors and Gates:
- There are three doors in/out of this zone
- 1 door (at A) leads to the zone The Fume Vaults (B1)
- 1 door (at B, ground level; locked, needs The First Key of Dark Hate) leads to the zone Halls of Dark Hate (B3)
- 1 door (at C, first level; locked, needs The Second Key of Dark Hate) leads to the zone Halls of Dark Hate (B3)
Other:
- 1 Runed Portal (at D, first level) that teleports you to the second level
- 1 Runed Portal (at D, second level) that teleports you to the first level
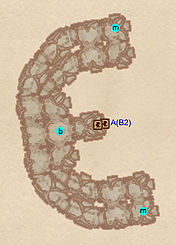
Halls of Dark Hate[edit]
There is little to do in this zone other than using one of the two corridors to ascend all the way to the top. Remember that you need both keys of the Dremora Hatred Keepers, found in The Embers of Hatred, in order to unlock the necessary doors.
Doors and Gates:
- There are two doors in/out of this zone
- 1 door (at A; locked, needs The First Key of Dark Hate) leads to the zone The Embers of Hatred (B2)
- 1 door (at A; locked, needs The Second Key of Dark Hate) leads to the zone The Embers of Hatred (B2)
Other:
- 1 Blood Fountain at location b on map
- 2 Magicka Essences at m
